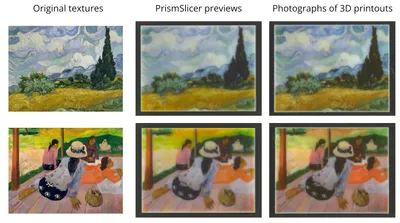
Getting custom colors from a resin-based SLA printer? Unheard of for most of us. In a previous post, we presented multiple ways you can blend custom colors for your resin printer, and highlighted how labor-intensive the trial-and-error recipe-finding process can be.
In this guide we’ll show you a streamlined workflow that removes the guesswork entirely. By leveraging an online color-picker, you can generate a precise mixing recipe in seconds, then even preview the resulting color and translucency on your model with PrismSlicer SLA. The bottom line is consistent, repeatable colors on the first try without endless manual experimentation.
The calculator works with CMYKW (Cyan, Magenta, Yellow, Black, White) resin sets from multiple manufacturers. If a color can’t be reproduced perfectly, the tool returns the closest possible match.
Step-by-Step Workflow
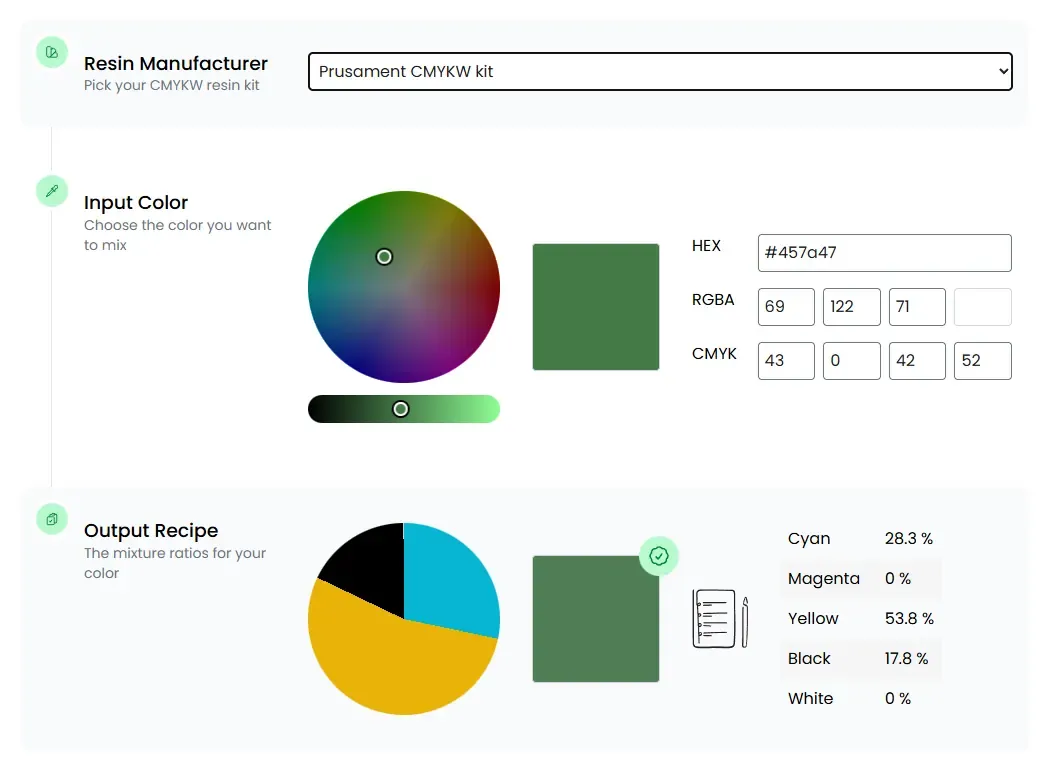
Figure: The online Color Picker with a Prusament CMYKW resin kit selected and the CMYKW recipe for mixing a green color.
Our company provides this online tool for free without advertisements.
No lock-in for specific resin or printer manufacturers: Our goal is to support as many as possible!
2. Choose Your Resin Kit
From the dropdown, pick the CMYKW resin kit you’ll be mixing
We are constantly working on adding support for more. Let us know which one you are using!
If you work with multiple manufacturers, you can combine them as well (see Feature for Power Users below).
3. Input Your Desired Color
Either select a hue from the wheel or paste exact values (HEX, RGB, Lab, etc.).
Remember: human color perception is always relative to a certain light source. Most commonly, outdoor sunlight at noon (D65) is used as the reference for the color value (sRGB, CIE Lab etc.).
Pantone provides a converter as well, but tries to lock you in, and you have to pay to convert into a standard color format.
4. Generate the Recipe
The calculator automatically processes your input color to find the optimal recipe for it.
Colors that are outside the gamut, meaning they cannot be reproduced by the chose resin kit, will be mapped to their closest equivalent that is mixable.
The tool returns two formats:
Format
What It Shows
Percentages
Relative proportion of each base resin (e.g., 42 % Cyan, 18 % Magenta…)
Milliliters
Absolute volumes for a target batch size you specify (e.g., 50 ml total → 21 ml Cyan, 9 ml Magenta…)
5. Preview the Result in PrismSlicer SLA (Optional)
Download & Install — Grab the latest version of PrismSlicer SLA from the download page.
Load Your Model — Import your STL, OBJ, or 3MF file onto the build plate.
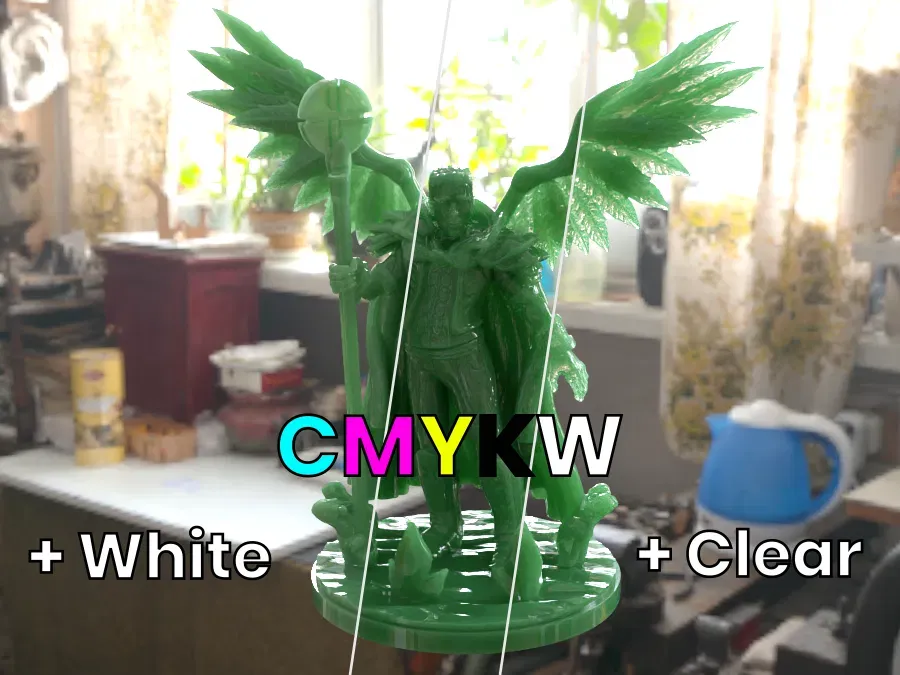
Apply the Recipe — In the Material Mixture panel, paste the percentages for each resin (multiply by 10 to input fractional numbers).Figure: We loaded a model into PrismSlicer SLA and applied the mixture recipe. Model: Oran by Bytor
Select an Environment — Choose a lighting setup (studio, outdoor, indoor, etc.) that matches your intended use case.Figure: After choosing an environment (Artist Workshop) with backlighting we can tune the desired image quality. More samples increase the image quality, but also take longer to compute. Model: Oran by Bytor
Render — Hit Render Preview. PrismSlicer uses physically-accurate ray tracing to generate a photorealistic image of the printed part with the exact color and translucency of your resin mixture.Figure: The resulting preview shows the translucency of the resin as well as photorealistic reflections. Model: Oran by Bytor
6. Fine-Tune Your Recipe (Optional)
Too Opaque? Increase the proportion of clear resin.
Too Translucent? Need More Opacity? Add a bit more white (or black, depending on the shade).
Adjust Roughness — Tweak the surface roughness parameter to simulate your post-processing (sanding / polishing).
Quick Iterations — Experiment and re-render until you’re satisfied with the recipe.
The same preview with 28% added white resin. Model: Oran by Bytor
Experimenting virtually with PrismSlicer (all versions) saves you from having to measure resins (15 min), stir the mixture (5 min), print a test piece (≥10 min), and clean the printer (15–30 min) over and over again. You can cut down your iteration times from hours to minutes while saving resin and manual labour.
7. Measure and mix your resins
Pour the resins together in a container (HDPE is recommended) where you can stir it well.
Use syringes, pipettes, or graduated measuring cups to transfer the exact amounts.
Sneak up on the full amount in coarse and fine steps (e.g. 34.2 ml = 20+10+1+1+1+1+0.2 ml) so you don’t accidentally overshoot.
Clean the syringes in Propanol afterwards so you can re-use them (after drying).
8. Print
With your resin-mixture loaded into the vat, print your models from your favorite slicer.
Curing times can affect the final color, so make sure to stay with the manufacturers recommendations.
Enjoy the final part in the right color without having to paint it!
Feature for Power Users
PrismSlicer SLA isn’t limited to a single resin brand. You can:
Add Multiple Resin Kits — Define separate CMYKW sets for different manufacturers.
Swap Individual Colors — Replace the default white resin with a tougher, UV-stable white from another supplier, or swap a magenta for a high-viscosity variant.
Blend Across Brands — Mix and match any combination, then instantly see how the hybrid formulation behaves on your model.
This flexibility lets you tailor mechanical properties (hardness, toughness, flexibility) while still controlling color.
Minimum Batch Size — 50–100 ml (adjust based on print bed size)
Closing Thoughts
By integrating an online color calculator with PrismSlicer’s virtual preview, you eliminate the tedious “mix-and-test” loop that has long plagued resin printing in color. The workflow is deterministic, repeatable, and adaptable to any resin brand you prefer.
Give it a try on your next project, and you’ll see how much time and head-ache this process saves you. Happy printing!
_with_backlighting-PrismSlicer_by_Additive_Appearance.BjbfZmN7_ZXqXcY.webp)
_with_backlighting_and_added_clear-PrismSlicer_by_Additive_Appearance.CW8DCWSe_1fdc1T.webp)
_with_backlighting_and_added_white-PrismSlicer_by_Additive_Appearance.DWFA2v3m_A7PRs.webp)